VULNERABILIDADES URNAS ELETRONICAS

Vulnerabilidades nas urnas eletrônicas Brasileiras.

Mais de 50 países recusaram as urnas eletrônicas utilizadas no Brasil, devido à facilidade de FRAUDES. Vou explicar de forma que leigos possam entender, através de uma análise dos problemas que podem ter ocorrido nas últimas eleições.

Contem uma análise realizada pela UNICAMP, onde o TSE impediu o avance nos testes de intrusão, mesmo havendo comprovações da falta de segurança nas urnas eletrônicas.

Nosso país, tem um sério risco de ameaça à democracia, a Alemanha, por exemplo, julga como inconstitucional essa forma de voto eletrônico, uma vez que coloca a democracia em dúvida.

Todas as referências estão ao final desse “mini artigo”.

Vulnerabilidade 1

A chave de criptografia está sob o poder do TSE e uma cópia com a Presidência da República, confiando apenas na ética e procedimentos do governo, em manter em sigilo.

Com base no cenário atual, sabemos que o Governo é de procedência duvidosa, refiro-me tanto ao PT quanto ao PMDB (Temer), alem do nosso governo a  empresa responsável pelo desenvolvimento das urnas eletrônicas no Brasil, A DIEBOLD, tem seu nome como uma empresa Corrupta nos Estados Unidos, mais detalhes vide Item 6.

Com a chave de criptografia em mãos fica fácil realizar a alterações de votos, pense como uma chave de um cofre, após a porta aberta, você tem acesso a tudo dentro, podendo, então, trocar jóias originais por réplicas. A descoberta pode ser imperceptível, porém, no mundo digital é roubo ou alteração de informações.

Vulnerabilidade 2

Não há como saber se o aplicativo que está na urna eletrônica não está modificado. Mesmo com verificações de arquivos específicos como certificados, nada impede que durante a verificação seja exibido o arquivo legitimo, mas este faz apenas um papel de zumbi, um arquivo morto, que o software FRAUDADO não esta utilizando.

Vulnerabilidade 3

Pode-se utilizar um algoritmo que fraude aproximadamente 10 ou 20 % dos votos, em todas as centenas de milhares de urnas do País. Ou ainda que calcule o número de votos em determinadas urnas, e distribua prevalecendo X % para o candidato que participa da fraude, isso dará uma pequena diferença e dará a impressão que a disputa foi acirrada, e a eleição legítima. Isso nos deixa em dúvida se nas eleições de 2014, não houveram FRAUDES.

Como por exemplo, no voto para presidente em 2018, em que muitos eleitores reclamaram que apareceu uma tela “Carregando”. Nesse momento, poderia estar sendo executado um programa, que está calculando e redistribuindo os votos para outro candidato.


Vulnerabilidade 4

Não existe auditoria por empresas confiáveis e com gabarito de especialistas nas urnas.
Durante a votação, deveriam haver auditorias por cidades, via sorteio, antes da apuração dos votos ou retirada da memoria Flash para envio dos votos para contabilização.

Vulnerabilidade 5

Atualmente o código é extenso, o que torna muito difícil a análise para verificar se houve alguma modificação, por fraudadores.


Vulnerabilidade 6

A Empresa DIEBOLD que foi a responsável pela fabricação das urnas, é marcada como Corrupta nos Estados Unidos, e foi condenada a pagar uma multa de U$ 48 Bilhões, por tentativa de corrupção para funcionários de instituições financeiras, em venda de ATM´s ( Conhecido no Brasil como Caixas Eletrônicos 24 Horas). O que impede uma empresa corrupta de vender uma vulnerabilidade na Urna? Ou ainda um presidente corrupto de utilizar a chave de criptografia para fazer alterações?


Não existe nenhum país no mundo, exceto o Brasil, que utilize urnas eletrônicas sem uma comprovação de voto externo, voto impresso.

Neste sentido, segue trecho do artigo publicado no Jornal “A Gazeta do Povo” (Principal jornal no Paraná).

“O professor da Universidade Estadual de Campinas (Unicamp) Diego de Freitas Aranha coordenou uma equipe de profissionais num teste de segurança promovido pelo Tribunal Superior Eleitoral (TSE) em 2017. A missão deles, mostrar possíveis falhas no sistema de votação eletrônica adotado no Brasil, foi concluída com êxito.

– No último dia de testes tivemos progressos. Conseguimos, por exemplo, alterar mensagens de texto exibidas ao eleitor na urna para fazer propaganda a um certo candidato. Também fizemos progresso na direção de desviar voto de um candidato para outro, mas não tivemos tempo de testar esse tipo de ataque – explicou.

Segundo Diego, a equipe dele trabalhou em condições piores do que trabalhariam verdadeiros fraudadores, devido a restrições técnicas e de tempo impostas pelo tribunal, mas ainda assim foi possível explorar pontos vulneráveis para adulterar o software de votação e entrar no ambiente da urna eletrônica.

Segundo o professor da Unicamp, o resultado não foi surpresa, visto que todo software é potencialmente vulnerável. Por isso, é importante o registro físico para que a escolha do eleitor seja resguardada de outra forma.


 Esse é um entendimento da comunidade técnica internacional e segue a experiência de outros países. Não há país no mundo que tenha migrado para a votação eletrônica que não use o registro físico do voto como mecanismo de transparência. O registro físico é inegociável. É um instrumento básico de transparência – afirmou.

Professor lembrou que há cinco anos participou de testes semelhantes feitos pelo TSE. E na ocasião a equipe dele elaborou um ataque que quebrava o sigilo dos votos.

– Demonstramos que era possível recuperar os votos da urna em ordem, sabendo exatamente como votaram o primeiro, o segundo, o terceiro eleitores e assim sucessivamente – explicou.

Entretanto, outras fragilidades do sistema eletrônico podem ser citadas, como bem assinala o perito Marcos Camargo3:

“O RDV é um arquivo eletrônico contendo os votos de cada eleitor de uma urna em particular, um por linha. Para preservar o sigilo do voto, a posição das linhas é embaralhada, de modo que não é possível fazer correspondência de um voto com um eleitor específico. De fato, nem o próprio eleitor de posse do RDV é capaz de dizer qual linha corresponde ao seu voto. Caso haja uma suspeita de fraude em uma urna específica, o RDV não é suficiente para se auditar a contagem. Ele permite apenas se verificar a quantidade de votos versus a quantidade de eleitores que efetivamente votaram. Para auditar uma urna seria necessário convocar todos os eleitores, solicitar que divulguem seus votos e comparar o resultado com o RDV. Este procedimento é inviável pois viola o sigilo do voto e seria impossível de realizar em larga escala.

Para tentar compensar esta falta de auditoria do RDV, o TSE incorporou no processo um procedimento denominado votação paralela. Na véspera da eleição são sorteados um conjunto de urnas que são carregados na sala do TRE ao invés da seção eleitoral e nelas são inseridos votos abertos, que são lidos para os presentes. Ao final da votação é impresso um boletim de urna e comparado com as anotações dos presentes. Este procedimento tem por objetivo garantir que a urna opera como planejado e que não houve nenhum comportamento escuso por parte da mesma. Porém este procedimento não resolve a questão da falta de auditoria dos votos dentro das urnas. Este e outros processos inseridos pelo TSE para suprir a falta de auditoria do RDV visam apenas avaliar se a urna funciona conforme planejado. Um contraexemplo importante seria uma fraude implantada diretamente no código fonte por um funcionário malicioso do próprio TSE que seja sofisticada o suficiente para se esconder durante as inspeções do código fonte e detectar a votação paralela de modo a não realizar a fraude nestas urnas. Existem diversos elementos de segurança no sistema que dificultam uma fraude deste tipo, porém não se pode considerar como impossível esta possibilidade.”

Os exemplos mencionados chamam a atenção não apenas para o número de fraudes que podem ser praticadas nas urnas eletrônicas e na contagem final de votos. Mas em especial, pela total impossibilidade do juiz eleitoral, do promotor de justiça eleitoral, e mais importante ainda, o cidadão comum, poderem detectar uma eventual fraude eletrônica e tomar as devidas medidas legais para neutralizá-lo”.

Conclusão:

Podemos concluir que o processo não é confiável, e as autoridades estão de olhos fechados para esse risco a nossa democracia. Fica a duvida, será que alguém esta sendo privilegiado por isso a “vista grossa”?


Fontes Bibliográficas:

GAZETA DO POVO

https://www.gazetadopovo.com.br/instituto-politeia/membros-do-ministerio-publico-e-do-poder-judiciario-lancam-nota-tecnica-em-defesa-do-voto-impresso/

ORGÃO ANTI CORRUPÇÃO EUA, EMPRESA DIEBOLD CITADA.

https://www.sec.gov/spotlight/fcpa/fcpa-cases.shtml

ANALISE DE HACKER URNAS ELETRONICAS

https://folhapolitica.jusbrasil.com.br/noticias/112550662/grupo-hacker-diz-que-urnas-eletronicas-do-brasil-sao-propositalmente-falhas-e-acusa-vulnerabilidades

RECONHECIMENTO DE ALGUMAS VULNERABILIDADES PELO TSE.

http://www.justificando.com/2018/09/21/urnas-eletronicas-vulnerabilidade-nao-e-fraude/

https://jornalggn.com.br/blog/iv-avatar/protogenes-queiroz-denuncia-fraude-nas-urnas-eletronicas-em-sp

Urna Argentina é muito mais confiável que a Brasileira, segundo especialistas.

http://www.politicanarede.com/2013/11/urna-eletronica-argentina.html

http://tiinside.com.br/tiinside/seguranca/15/10/2013/urna-eletronica-falhas-afirmam-especialistas-debate-comissao-tecnologia/


SCOM 2012 – Manually triggering a Discovery via the SCOM Console (On Demand Discovery)

SCOM 2012 – Manually triggering a Discovery via the SCOM Console (On Demand Discovery)

Posted by Matthew on January 24, 2013

We’ve all been there – you’ve just added a new role to a server, installed a new component or got around to updating an expired licence, and now you’ve got to sit there and wait until the next discovery cycle occurs (potentially up to 24 hours in some cases).

However, Operations Manager 2012 includes a nice little Agent task you can run on a health service to manually trigger a discovery attempt!  I haven’t found much documentation for the task or the module (it’s not composite, and I haven’t yet deconstructed it) but I’ve used it a couple of times now and it always works a treat!

warning

Disclaimer: I don’t know exactly how this task interacts with discoveries that don’t feature Probe modules expecting a trigger item somewhere in their cooked down chain.  If your Discovery is based on the presence of a Windows event, this may not function as expected.   Discoveries based on schedules (normally via System.Discovery.Scheduler) should function fine.

The high level steps are:

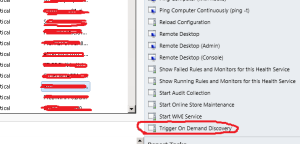
  1. Locate the “Trigger On Demand Discovery Task” for the health service you need to run the discovery from.
  2. Find the DiscoveryId so that SCOM knows which discovery to run.
  3. Find the TargetInstanceId so SCOM knows which specific object the discovery should run for.
  4. Run the task, overriding with the appropriate IDs.

Run the Task against the appropriate Health Service

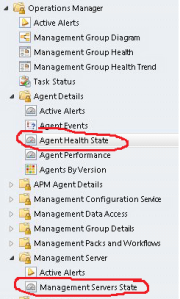
So, how do I run this task?  Well you’ll find it targeted at health Services, so the Agent Health State or Management Servers State views under the Operations Manager folder will do the trick.

Operations Manager Agent Views

Select the Agent/Management server that you want the discovery to be triggered on (make sure you select the state view on the right and not the “from health service watcher” items) and you should see the task show up in the task pane on the far right.

On Demand Discovery Task

Don’t run it yet though, because now comes the only tricky part – you MUST specify which discovery the agent should trigger, and which target instance that discovery should be run for.  These have to be specified as the internal GUID that SCOM assigns to entities.  What’s the best way to retrieve that you ask?  Powershell of course!

DiscoveryId

In order to get your DiscoveryId you can use the Get-ScomDiscovery cmdlet with the -Displayname parameter, or if you know it the –Name parameter.  The Displayname is what displays in the SCOM console in the “Object Discoveries” section of the Authoring pane.  The Name is whatever name the MP Author gave the discovery when writing the management pack.

Either way, once you’ve run that cmdlet and found your discovery you want the guid displayed in the Id property.  It will look something along the lines of: 94d82cfb-2644-97ab-b42c-f0438d77b90a

TargetInstanceId

Now to get your TargetInstanceId guid we need to find the unique ID that’s been assigned to the particular instance of the object that your discovery targets.  Most times this is probably going to be a windows computer or server object.  In order to find this we can use the Get-ScomClass and Get-ScomClassInstance cmdlets. If you are comfortable getting this, skip head to the next section (PROTip: The class id is available in the .Target.Id property of the discovery object you returned above).

First we need to get the Class that the discovery targets .  In the authoring pane of the SCOM console where you got the discovery name from, note down the value in the “Target” column.

Next, load up the Discovered Inventory view in the Monitoring Pane, and change the Target Type (via the task pane on the right) to your class you got from the Discovery target column.  Note down the displayname of the object that you want to run the discovery against (for example, a particular computer name).  Finally, run the below command

Get-SCOMClass -DisplayName “Discovery Target name goes here” | Get-SCOMClassInstance -Displayname “Object Displayname goes here” | fl Displayname,Id

This will display another guid, which is your TargetInstanceId.  Almost there!

Override and Run the Task

Head back to the Agent/Management server view, select your health service that you want the discovery to run on, and click on the task.  You’ll see the following screen:

On Demand Discovery Options

Hit the Override button, and in the “New Value” column enter in your TargetInstanceId and DiscoveryId guids that you found in the previous steps.  HitOverride, and then back on the run task screen click Run.  The discovery request will launch and should complete fairly quickly (faster than your discovery will at any rate.  Task completion doesn’t mean the discovery has finished, merely that the trigger request was sent successfully).  If you see any errors listed in the task results pane, then it’s likely you’ve got the wrong guid somewhere.

And that’s it.  Hopefully after a short amount of time your class objects should start to appear in SCOM.  If your discovery finds the root of a hierarchy of objects, you don’t need to submit a trigger for each subsequent object – those will be discovered immediately as normal once your root object is discovered.

Hope that helps you having to wait around for your latest installed component to show up in SCOM, and get back to monitoring!

Demystifying the ‘Blue Screen of Death’ – IRQL_NOT_LESS_OR_EQUAL

Demystifying the ‘Blue Screen of Death’


Referencia.

176 out of 287 rated this helpful Rate this topic
Archived content. No warranty is made as to technical accuracy. Content may contain URLs that were valid when originally published, but now link to sites or pages that no longer exist.
By Brien M. Posey, MCSE for TechRepublic.com

Have you ever had that 3:00 AM phone call from someone saying that one of your servers is displaying the Blue Screen error – affectionately known among IT Pros as the “Blue Screen of Death”? In such a situation, your first instinct would probably be to tell them to reboot the server and let you go back to sleep. However, as you’ve probably already found out, rebooting isn’t always the magic cure all. It can be a gut-wrenching feeling, staring at the incomprehensible blue screen with all its numbers and codes. However, this experience doesn’t have to be so traumatic. The secret is to know how to read the Blue Screen of Death. In this article, I’ll show you how to read the Blue Screen of Death. I will also discuss some of the errors that you’re likely to encounter and provide you with some techniques for eliminating them.

On This Page

Anatomy of a Blue Screen
The Error Message
Modules That Have Loaded
Modules That Were About to Load
Kernel Debugger
An Easier Way
Memory Dump
Last Known Good Configuration
Conclusion

Anatomy of a Blue Screen

There are four basic sections that you should be aware of on a Blue Screen of Death:

  • The first section lists the actual error message.
  • The second section lists the Microsoft® Windows NT® modules that are already loaded into memory.
  • The third section lists the modules that were about to be loaded had the error not occurred.
  • The fourth section lists the current status of the Kernel Debugger.

I’ll cover each of these sections in detail.

The Error Message

The section circled (with a white box) in Figure A shows the actual error message. This message contains an error code number, the addresses where the error occurred, and a text code indicating the type of error. Below, I’ve listed some of the more common error codes and their causes.

Cc750081.bsoda(en-us,TechNet.10).gif

Figure A: This is the actual error message.

DIVIDE_BY_ZERO_ERROR

This error is caused by an application trying to divide by zero. If you receive this error and don’t know which application caused it, you might try examining the memory dump.

IRQL_NOT_LESS_OR_EQUAL

The IRQL_NOT_LESS_OR_EQUAL error is caused by a buggy device driver or an actual hardware conflict. If you’ve recently added new hardware to your system, try removing it and see if the error goes away. Likewise, if you’ve recently loaded a new device driver, you might try using ERD Commander Professional Edition, by Winternals Software, to temporarily disable the new driver and see if the problem goes away.

KMODE_EXCEPTION_NOT_HANDLED

An incorrectly configured device driver usually causes this type of error. As I’ll explain later, you can use another section of the blue screen to figure out which driver is causing the problem.

REGISTRY_ERROR

Such an error indicates a catastrophic failure in the system’s registry. However, this error can sometimes be caused by failure to read the registry from the hard disk rather than because the registry itself is corrupt. Most of the time though, if you get this error, you’ll have to restore from backup.

INACCESSIBLE_BOOT_DEVICE

Just as the name implies, this error indicates that Windows NT is having trouble reading from the hard disk. This error can be caused by a faulty device driver or a bad small computer systems interface (SCSI) terminator. If you’ve checked for these problems, but are still receiving the error, check to make sure that a virus hasn’t destroyed your boot sector.

UNEXPECTED_KERNEL_MODE_TRAP

This error message is almost always caused by your computer’s memory. If you receive this error, check to make sure that all of your single inline memory modules (SIMMs) are the same type and speed. You should also check to make sure that your computer’s Complementary Metal Oxide Semiconductor (CMOS) is set for the correct amount of RAM. If all of these suggestions check out, try replacing the memory in the computer.

BAD_POOL_HEADER

This is, perhaps, the most obscure error message. In most cases, if you receive this error, it’s related to the most recent change you’ve made on your system. Try undoing the change to get rid of the error.

NTFS_FILE_SYSTEM

An NTFS_FILE_SYSTEM error indicates hard disk corruption. If your system is bootable, run CHKDSK /F on all of your partitions immediately. If your system isn’t bootable, try installing a new copy of Windows NT in a different directory. You can use that copy to run the CHKDSK program. When you’re done with the second copy, you can edit your BOOT.INI file to make your computer start your original copy of Windows NT.

KERNEL_DATA_INPAGE_ERROR

This error indicates that Windows NT wasn’t able to read a page of kernel data from the page file. Bad memory, a bad processor, incorrectly terminated SCSI devices, or a corrupt PAGEFILE.SYS file may cause this situation. The first step in correcting such an error is to recreate the PAGEFILE.SYS file and see if you can bring your system back online.

NMI_HARDWARE_FAILURE

This is a generic error message in which the hardware abstraction layer can’t report on the true cause of the error. In such a situation, Microsoft recommends calling the hardware vendor. This error can sometimes be caused by mixing parity and non-parity SIMMs, or by bad SIMMs.

Modules That Have Loaded

The section that I’ve circled in Figure B shows the modules that Windows NT has already loaded into memory. You can use this section primarily to look at the modules that are already loaded, and be somewhat confident that none of the modules listed are causing your problem.

Cc750081.bsodb(en-us,TechNet.10).gif

Figure B: These are the modules that Windows NT has already loaded into memory.

Modules That Were About to Load

The section that I’ve circled in Figure C shows which modules were about to load when the error occurred. Many times, this section can give you an idea of which module is causing your problem. This is especially true if you’re receiving a KMODE_EXCEPTION_NOT_HANDLED error. For example, suppose that the next module on the stack to load was tcpip.sys. In such a situation, it’s likely that an incorrect network card driver may be causing your problem. If you happen to own ERD Commander Professional Edition by Winternals Software you could disable the network card driver, and try booting your system again. If the system boots, you could correct the driver problem.

Cc750081.bsodc(en-us,TechNet.10).gif

Figure C: These are the modules that were next to load, had the error not occurred.

Kernel Debugger

The section circled in Figure D indicates the current status of the kernel debugger. The kernel debugger enables you to link two computers running Windows NT via a RAS connection or a null modem cable. When a Blue Screen of Death occurs, the crash dump information is sent to the functional computer for diagnosis.

Cc750081.bsodd(en-us,TechNet.10).gif

Figure D: This section lists the status of the Kernel debugger.

To use the kernel debugger, both computers must be running the same version of Windows NT, and have the symbol set installed. You must also install the debugging software from the \SUPPORT\DEBUG\PI386 directory on your Windows NT CD-ROM.

Next, you must add environment variables to both computers, as shown in Table A:

Table A

Variable Value
_NT_DEBUG_PORT COM1 or COM2
_NT_DEBUG_BAUD_RATE baud rate
_NT_SYMBOL_PATH location of symbol files

Add these environment variables.

At this point, you need to modify the BOOT.INI file on the computer that you plan to use to examine the crash dump information. To do so, add /CRASHDEBUG to the end of the line that you plan to use to boot Windows NT. Reboot Windows NT before continuing.

When both machines are set up, you must run the REMOTE program before triggering the blue screen. On the PC having the problem, type the following command:

REMOTE /s "I386KD –v" DEBUG

In this command, the /s indicates that this computer will act as a server and send the crash dump file to the client. The –v indicates verbose logging mode.

On the computer that you plan to use to examine the crash dump, type the following command:

REMOTE /C computername DEBUG

In this command, the /C indicates that this computer will function as a client and receive the crashdump file from the server. The computername is the name of the computer having problems.

An Easier Way

As you can tell, setting up the kernel debugger can be complicated. If you don’t want to go through all of this, there are a couple of other things you can try first.

Memory Dump

If your computer is bootable, you can set Windows NT to create a memory dump file when a Blue Screen of Death occurs. To do so, open the System Properties dialog box from Control Panel and go to the Startup/Shutdown tab. Next, set the options shown in Figure E. Keep in mind that the partition where you store the memory dump file must have at least enough free space to store your page file, plus your physical RAM space, plus 1 MB. For example, if your machine has 128 MB of RAM, the partition must have enough free space for the page file, plus an extra 129 MB.

Cc750081.bsode(en-us,TechNet.10).gif

Figure E: Use these options to create a memory dump file.

Once you’ve created a memory dump file, you can use the DUMPEXAM.EXE program in the \SUPPORT\DEBUG\I386 directory of your Windows NT CD-ROM to create a report of the crash. You can see an example of such a report in Figure F.

Cc750081.bsodf(en-us,TechNet.10).gif

Figure F: You can use the DUMPEXAM.EXE program to create a report similar to this one.

Last Known Good Configuration

You have undoubtedly heard the phrase, “If it ain’t broke, don’t fix it.” In the world of Windows NT, this can be especially true. Blue screens don’t occur without reason. If you have a blue screen that you can’t seem to figure out and you’ve ruled out a hardware failure, chances are that it may be related to a change that you or someone else has recently made. In such a situation, you could try using the Last Known Good Configuration as a last resort. Using this option will sometimes bring your system back to life, but will undo the changes that you’ve made since the last time the system was rebooted.

Conclusion

In this article, I’ve discussed the various pieces of information displayed on the notorious Blue Screen of Death. As I did, I explained what each of these items meant, and provided you with several steps you can take to correct the error.

Brien M. Posey is an MCSE who works as a freelance writer. He also works as a systems engineer for the United States Department of Defense. You can contact him at Brien_Posey@xpressions.com. Because of the high volume of e-mail that he receives, it’s impossible for him to respond to each message, although he does read them all.

We at Microsoft Corporation hope that the information in this work is valuable to you. Your use of the information contained in this work, however, is at your sole risk. All information in this work is provided “as -is”, without any warranty, whether express or implied, of its accuracy, completeness, fitness for a particular purpose, title or non-infringement, and none of the third-party products or information mentioned in the work are authored, recommended, supported or guaranteed by Microsoft Corporation. Microsoft Corporation shall not be liable for any damages you may sustain by using this information, whether direct, indirect, special, incidental or consequential, even if it has been advised of the possibility of such damages.

Instalando Hyper-V Windows 2012

Hyper-V

Instalando Hyper-V Windows 2012

Descição da função e Tecnologia

A função do Hyper-V permite criar e gerenciar um ambiente de computação virtualizado, usando a tecnologia de virtualização interna do Windows Server 2012. Instalar a função Hyper-V instala os componentes necessários e, como opção, instala ferramentas de gerenciamento. Os componentes necessários incluem hipervisor do Windows, o Serviço Gerenciamento de Máquinas Virtuais do Hyper-V, o provedor WMI de virtualização e outros componentes de virtualização como barramento VMbus, VSP (provedor de serviço de virtualização) e VID (unidade de infraestrutura virtual).

Requisitos de Hardware

O Hyper-V requer um processador de 64 bits que inclua:

Virtualização assistida por hardware. Isso está disponível em processadores que incluem uma opção de virtualização, especialmente, processadores com tecnologia Intel Virtualization Technology (Intel VT) ou AMD Virtualization (AMD-V).

A DEP (Prevenção de Execução de Dados) imposta por hardware deve estar disponível e habilitada. Especificamente, você deve habilitar o bit Intel XD (bit execute disable) ou o bit AMD NX (bit no execute).

Requisitos de software (para sistemas operacionais convidados que recebem suporte)

O Hyper-V inclui um pacote de software para sistemas operacionais convidados suportados que melhoram a integração entre o computador físico e a máquina virtual. Esse pacote é conhecido como serviços de integração. Em geral, você instala este pacote no sistema operacional convidado como um procedimento separado depois de instalar o sistema operacional na máquina virtual. No entanto, alguns sistemas operacionais possuem os sistemas de integração incorporados e não exigem uma instalação separada. Para obter instruções sobre como instalar serviços de integração, consulte Instalar a função Hyper-V e configurar uma máquina virtual. 1. Abra o Server Manager

2. Clque em Add Roles and Features

3. Na inicial o Wizard clique em Next

4. Selecione Role-Based or Feature-Based Installation e clique em Next

5. Selecione o servidor a ser instalado o Hyper-V e clique em Next

6. Selecione a Role ou Função de Hyper-V e as devidas features que ele adiciona automaticamente e clique em Add Features

7. Observe que a Role de Hyper-V foi adicionada. Clique em Next

8. Clique em Next na próxima tela

9. Novamente Next

10. Selecione a placa de rede que o Hyper-V irá trabalhar e clique em Next

11. Clique em Next

12. A tela seguinte refere-se ao local onde serão gravados os discos e as máquinas virtuais. A figura 1 é do local padrão do sistema e a figura 2 o local que eu personalizei.

13. Como a instalação do Hyper-V requer um reboot eu já marquei a caixa “Restart the destination server automatically if required. Entretanto, é emitido um alerta dizendo que a máquina será reiniciada automaticamente sem avisos. Certifique-se de não estar com nenhuma aplicação aberta. Clique em Yes e Install

14. Instalação em andamento… Aguarde a conclusão que a máquina será restartada

15. Após reiniciar você receberá a tela dizendo que a instalação finalizou com sucesso. Clique em close

Conclusão: Com esse tutorial vimos como instalar o Hyper-V no Windows Server 2012

Alterando tempo de espera para inclusão de nova fita, no DPM 2012.

Para alterar o tempo de espera, para incluir uma nova fita na unidade, a alteração é necessaria fazer via registro do windows.

Para filiais que não possuem robos , esta é uma pratica altamente recomendada,  pois o padrão é em torno de 30 minutos, apos passado este tempo o backup falhará, caso não for colocado uma nova fita.

Importante que esta fita esteja limpa,  ou os dados que estejam nela, ja estejam expirados.

Por exemplo se os dados que estão nesta fita, tem a retenção de 7 dias, somente poderá utiliza-la no DPM, apos estes dados ultrapassarem os 7 dias.

Chaves para alterar no registro, afim de definir o tempo de espera. Recomendavel reiniciar o servidor após aplicar, ou ao menos os serviços do DPM.

HKLM\Software\Microsoft\Microsoft Data Protection Manager\1.0\Prompting”
PromptingTimeOut:REG_Dword:43200000 (dec) = 12hrs

=-=-=Value is in milliseconds=-=-=
3600000 = 1 hour
43200000 = 12 hours
86400000 = 24 hours
129600000 = 36 hours
172800000 = 48 hours

COLOCATION DPM 2012 SP1

Pessoal,

Quando o co-location está ligado  é possivel utilizar a mesma fita, até sua capacidade total de armazenamento, reduzindo o numero de fitas, significativamente.

Hoje precisei ativar o Colacation no DPM 2012 SP1, pela linha comando como esta até a data deste post no site do Technet, apresenta erro, pois não esta alterado para interface grafica. Para ativar, Vá em Management e clique em “optimize tape” desmarque a opção da imagem abaixo:
DPM 2012 COLOCATION

Clique em advanced, para customizar o seu backup, de acordo com os  grupos de proteção.

Problema na instalção da interface grafica Windows Server 2012.

Problema na instalção da interface grafica Windows Server 2012.

A instalação leva em torno de 45 a 60 minutos ,para instalar então se chegar aos 68% e permanecer assim por muito tempo, é normal, aguarde mais um tempo, e certifique-se que o servidor tem acesso a internet.

Se o servidor não tiver acesso a internet , retornará o erro abaixo:

Install-WindowsFeature: O pedido para adicionar ou remover recursos no servidor especificado falhou

Install-WindowsFeature : The request to add or remove features on the specified server failed.

Caso o servidor não tenha acesso a internet e seja necessário instalar alguma feature como exemplo a de interface gráfica, digite o seguinte comando “-source wim:d:\sources\install.wim:4” , para como adicionar como origem o drive do CD.

O Comando que funcionará ficara da forma abaixo:

install-windowsfeature server-gui-shell, server-gui-mgmt-infra -source wim:d:\sources\install.wim:4